
Django is a high-level Python framework. It’s popular for its simplicity and efficiency in building robust web applications. At the heart of Django’s architecture is the Model-View-Template (MVT) pattern. Having a good understanding of how Models, Vi…
Django is a high-level Python framework. It’s popular for its simplicity and efficiency in building robust web applications.
At the heart of Django’s architecture is the Model-View-Template (MVT) pattern. Having a good understanding of how Models, Views, and Templates interact is crucial if you’re looking to harness the full power of Django.
Whether you are completely new to Django or a beginner, this article will serve as a comprehensive guide showing you how these components work and interact with each other to create dynamic web applications.
To make it even more understandable, we’ll build a simple application to help you better understand the interconnectivity of these components.
If you’re excited already, let’s get straight into it!
Here’s what we’ll cover:
Prerequisites
To follow along, you need:
-
Basic understanding of how web applications works, including client-server architecture.
-
Basic knowledge of Python.
What is the MVT Architecture?
The MVT pattern is Django’s approach to organizing the codebase and workflow of a web application. The components that make up this architecture are the Model, View, and Template. Each component performs specific functions and then passes the process to the other components to do theirs.
Let’s take a quick look at the components with the specific functions they perform:
-
Model: Also known as the data layer, it manages data and interacts with the database.
-
View: Also known as the logic layer, it acts as the intermediary, handles logic, and manages data flow.
-
Template: Also known as the presentation layer, it renders HTML content on the user interface.
Now that you have an idea about the components and their roles in a Django application, we’ll look extensively into each component and how they interact in the architecture.
The Model Component
Models manage the structure and interaction of data within a Django application, making them the foundation of Django apps due to the critical role data plays.
Django models utilize a powerful feature called Object-Relational Mapping (ORM), which bridges the gap between a relational database and Python code. It converts the Python objects (classes) into database tables, their attributes into columns, and instances into rows within those tables.
One huge advantage of the ORM is that it allows you to interact with the database using Python objects instead of writing SQL queries. Think of it as a translator that converts one language into another for an audience to understand. In this case, the ORM translates Python code into SQL commands that the database can execute, and vice versa.
Django models encapsulate all database-related logic and define the structure of your database, acting as a blueprint for the data you want to store.
General format of a Django Model
In Django, every model follows a particular way of declaration. Here is the basic structure of a model declaration:
class <model_name>(models.Model):
    <field_name> = models.<field_type>(<optional_field_characteristics>)
Let’s break it down:
-
class: the keyword used to define a model in Django. -
model_name: the name of the model. -
models.Model: the base class from which the model class inherits. -
field_name: the name of the database column. -
field_type: refers to the type of data the field holds likecharField,BooleanFieldand so on. -
optional_field_characteristics: used to further define how the field behaves, likemax_length,default, and so on.
Model Example
Having known everything about models up to this point, we’ll construct one for a Task list. It typically contains the task title, description, and an indicator as to whether the tasks were completed or not.
class Task(models.Model):
    title = models.CharField(max_length=100)
    description = models.TextField()
    completed = models.BooleanField(default=False)
In this model:
-
Task is the name of the model.
-
The Task model has three fields:
-
title: ACharFieldthat holds text, with a maximum length of 100 characters. -
description: ATextFieldfor longer text. -
completed: ABooleanFieldthat stores aTrueorFalsevalue, with a default ofFalse.
-
The View Component
Django views are responsible for processing user requests and returning responses. They act as the bridge between the Model and the Template by collecting data from Model objects, performing logical operations on them (such as queries based on certain criteria), and then passing the data to the template for display.
Views can be written as functions or class-based, depending on the complexity and requirements of your application.
General Format of a Django View
Here is the basic structure of a View:
def <view_name>(request):
    # View Logic goes in here....
    return render(request, <template>, <context>)
Let’s break it down:
-
view_name: the name of the view function. -
request: the HTTP request sent by the client to the Django server, could be triggered from form submissions or clicking a button. -
return render: used to generate the HTML response. It takes:-
request: the request object, which contains information about the incoming request. -
template: the template file to render. -
context: contains variables to be made available in the template, it usually comes in the form of a dictionary.
-
View Example
Continuing with our Task List, this is what our view would look like:
def task_list(request):
    # Logic goes in here...
    return render(request, <template>, {'tasks': tasks})
The Template Component
Django templates are responsible for rendering the final HTML output on the browser. They define how data should be presented, by using a combination of HTML and Django’s templating language.
Django templating language involves using template tags {% %} and template variables {{ }} that allow you to enter Django mode in your HTML template. In this mode, you can access variables defined in your Views and use control structures within your template.
Templates can also be styled using CSS or any of your favorite CSS frameworks to make your user interface more presentable.
Template Example
Our template is a normal HTML file with Django’s templating language. Here is how our Task List template would look like:
<!DOCTYPE html>
<html lang="en">
<head>
    <meta charset="UTF-8">
    <meta name="viewport" content="width=device-width, initial-scale=1.0">
    <title>Task List</title>
</head>
<body>
    <h1>Task List</h1>
    <ul>
        {% for task in tasks %}
            <li>{{ task.title }} - {{ task.completed|yesno:"Done,Not Done" }}</li>
        {% empty %}
            <p>No tasks available.</p>
        {% endfor %}
    </ul>
</body>
</html>
In this template:
-
The
forloop iterates through each task in thetaskslist (remember it was passed as context in our views). -
For each task, it outputs the task’s
titleand itscompletedstatus (as either “Done” or “Not Done”). -
If the
taskslist is empty, the{% empty %}block displays a fallback message saying “No tasks available.”
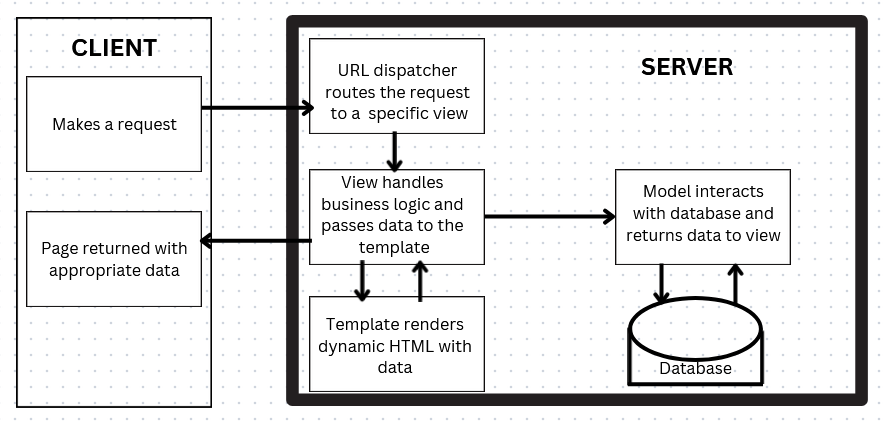
Diagram Showing the MVT WorkFlow
This diagram depicts how data flows within Django’s MVT architecture:
Real-World Analogy of MVT
Imagine you go to a restaurant and place an order for your favorite meal. Behind the scenes, the restaurant has a recipe book that outlines how each dish should be prepared. The chef uses the recipes to prepare your meal exactly the way you ordered it. Once it’s ready, the server delivers the meal to you in a presentable way.
Just as a chef follows the recipe to create the dish, the View uses the Model to gather and process data. Finally, like the server delivering the dish, the Template ensures the final output is presented in a clear and engaging format to the user.
Putting it All Together into a Project
This section will walk you through, from start to finish, how to set up the Task List we used as an example in the article. At the end, you should have a functional application with the MVT architecture in full flow.
Install Python
First, ensure you have Python installed. You can visit Python’s Official Website to download the latest Python version.
Set Up the Django Project and App
Next, install Django. You can install it using pip:
pip install django
Create a folder and open it in your favorite code editor.
Create a new Django project and app by running the following commands in your terminal, one after the other:
django-admin startproject myproject
cd myproject
django-admin startapp myapp
Define the Model
In your myapp/models.py:
from django.db import models

class Task(models.Model):
    title = models.CharField(max_length=100)
    description = models.TextField()
    completed = models.BooleanField(default=False)
Create a Form
We need a Django form based on the Task model, so we’ll create one using the Django ModelForm.
In your myapp, create a file, name it forms.py, and insert this code:
from django import forms
from .models import Task

class TaskForm(forms.ModelForm):
    class Meta:
        model = Task
        fields = ['title', 'description', 'completed']
In this code:
-
Taskis imported from.models. -
class TaskForm(forms.ModelForm): This creates a new class calledTaskForm, which is a subclass offorms.ModelForm. -
class Meta:: is a special class used by Django’sModelFormto provide configuration for the form. TheMetaclass tells Django how to create the form by specifying the associated model and the fields to include in the form. -
model = Task: specifies the model that the form is based on. In this case, the form is based on theTaskmodel. -
fields = ['title', 'description', 'completed']: specifies which fields from theTaskmodel should be included in the form. This allows you to control which model fields appear in the form, and it can be customized to include only certain fields, rather than all fields in the model.
Create the View
In your myapp/views.py, insert this code:
from django.shortcuts import render,redirect
from .models import Task
from .forms import TaskForm

def task_list(request):
    tasks = Task.objects.all()    # Retrieve all tasks

    if request.method == 'POST':    # Handle form submissions
        form = TaskForm(request.POST)
        if form.is_valid():
            form.save()
            return redirect('task_list')  # Redirect to avoid duplicate submissions
    else:
        form = TaskForm()

    # Pass tasks and the form to the template
    return render(request, 'task_list.html', {'tasks': tasks, 'form': form})
In this view,
-
TaskFormis imported fromforms. -
The code checks if the request method is
POST, indicating that the user has submitted a form. -
If the method is
POST, it creates an instance ofTaskFormusing the submitted data (request.POST). -
The form is then validated using
form.is_valid(), and if valid, the form is saved to the database. -
After saving, the user is redirected to the task list page to prevent duplicate submissions.
Define the Template
In your myapp directory, create a templates folder. Inside the templates folder, create a file and name it task_list.html. We need to add a form element that collects the user inputs and displays them in a list on the UI.
In the task_list HTML file, we have:
<!DOCTYPE html>
<html lang="en">
<head>
    <meta charset="UTF-8">
    <meta name="viewport" content="width=device-width, initial-scale=1.0">
    <title>Task List</title>
</head>
<body>
    <h1>Task List</h1>
    <ul>
        {% for task in tasks %}
            <li>{{ task.title }} - {{ task.completed|yesno:"Done,Not Done" }}</li>
        {% empty %}
            <p>No tasks available.</p>
        {% endfor %}
    </ul>

    <h2>Add a New Task</h2>
    <form method="post">
        {% csrf_token %}
        {{ form.as_p }}
        <button type="submit">Add Task</button>
    </form>
</body>
</html>
In the added form code:
-
We created an HTML form with the
POSTmethod for submitting data. It includes a{% csrf_token %}to protect against CSRF attacks. -
The form fields are rendered using
{{ form.as_p }}, which displays each field within a<p>tag. -
Finally, a submit button labeled “Add Task” is provided, allowing the user to submit the form data.
Folder Structure
Having reached this point, it’s important to cross-check if you are configuring your app the right way. Here is how your folder/file structure should look like:
└── 📁myproject
    └── 📁myapp
        └── 📁__pycache__
        └── 📁migrations
        └── 📁templates
            └── task_list.html
        └── __init__.py
        └── admin.py
        └── apps.py
        └── forms.py
        └── models.py
        └── tests.py
        └── urls.py
        └── views.py
    └── 📁myproject
        └── 📁__pycache__
        └── __init__.py
        └── asgi.py
        └── settings.py
        └── urls.py
        └── wsgi.py
    └── db.sqlite3
    └── manage.py
Configure the Project’s URL
In your myproject/urls.py, include the URL in your myapp:
from django.contrib import admin
from django.urls import path, include

urlpatterns = [
    path('admin/', admin.site.urls),
    path('', include('myapp.urls')),
]
Add the App to Project Settings
Add your myapp to the list of Installed apps in your myproject/settings.py:
INSTALLED_APPS = [
    'myapp',      # added our myapp app
    'django.contrib.admin',
    'django.contrib.auth',
    'django.contrib.contenttypes',
    'django.contrib.sessions',
    'django.contrib.messages',
    'django.contrib.staticfiles',
]
Run the Server
Apply migrations by running these commands:
python manage.py migration
python manage.py makemigrations
Visit http://127.0.0.1:8000/ in your browser to test out your app.
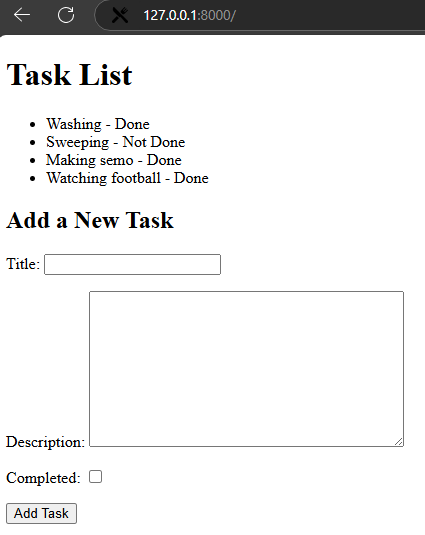
Final Look
Here’s how our task list app looks like on the browser after adding some tasks using the form. You can make further improvements in styling the template as you wish.
Conclusion
In this article, you learned about the components in the Django’s MVT architecture, how they interact with each other, and how they make web experiences seamless. We also built a simple project to see how it works practically, and I hope you understand it better now.
If you enjoyed reading this article, you can follow me on X or connect with me on LinkedIn for more programming articles and posts.
See you on the next one!